

Leap Administration#
This section includes the following information:
Overview provides an overview of Leap administration, including terminology.
Quick Start shows how to easily invite people to a seat-based project.
Managing Organizations shows how to view organization-related information.
Managing Projects shows how to update and view your projects.
Managing Project Members shows how to invite and manage members of your projects.
Managing Problem Submissions shows how to view and cancel problem submissions.
Generating Solver Usage Reports explains how to generated reports.
Overview#
Leap Admin is an easy-to-use cloud-based administration tool that you use to perform the following tasks:
Manage multiple projects in multiple organizations.
Invite people to a project. Projects are used to manage the project’s members and their solver access in the Leap service.
View the status of problems submitted to solvers.
Troubleshoot submission issues.
Generate solver usage reports.
For information about D‑Wave quantum computers, problems, and solvers, see the Get Started with Optimization or Get Started with Quantum Computing sections.
If you have access to Leap Admin, then you have been designated as a project or organization administrator with privileges to manage one or more projects or organizations that have been created by D‑Wave in accordance with your customer contract.
To get started quickly, go to the Quick Start subsection.
Leap Admin Organization Page#
When you open an organization, the organization page is displayed as shown in Figure 261.

Fig. 261 Leap Admin: Organization Page#
Tabs that organize tasks into logical groups are as follows:
Overview
Displays information about the organization.
Projects
Displays summary information for the projects in the organization. To display a project’s project page, click its name.
Leap Admin Project Page#
When you open a project, the project page is displayed as shown in Figure 262.
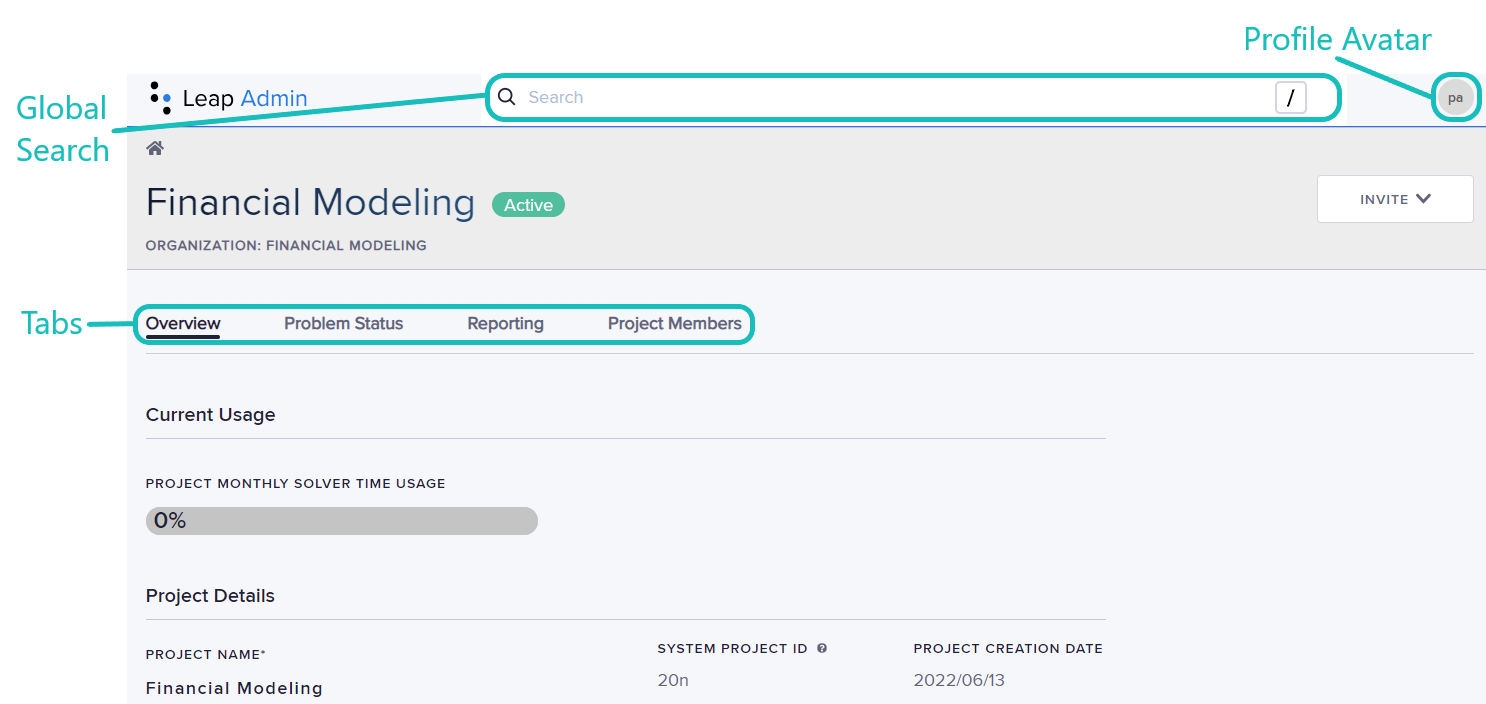
Fig. 262 Leap Admin: Project Page#
Tabs that organize tasks into logical groups are as follows:
Overview
Displays information about the project.
Problem Status
Displays a summary of the statuses of all submitted problems. To display the problem’s parameters and resulting sample set, click a problem ID.
Reporting
Enables generating CSV or Excel reports on solver usage statistics.
Project Members
Displays summary information for the project members. To display more information about a specific member, click their member name.
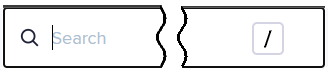
Global Search and Profile Avatar Menu#

Fig. 263 Global Search and Profile Avatar Menu#
You can perform the following tasks via global search and the profile avatar menu on the organization and project pages:
Global search field
Search for a project by name and for a member in any of your projects.
Profile avatar menu
From your profile avatar, select the appropriate menu item to go to the dashboard, this documentation, open a project, or log out of Leap Admin.
Administration Tasks#
-
You can view information about the organization, such as its name and status, and summary information about its projects, such as their status and number of members.
-
You can view project information such as the project members, the solvers available in the project, and the project status. For time-based projects, you can also set the default limit for any single member’s solver-access time.
Add and manage project members
To add members, you must first invite them to join the project. You can also set a per-member limit on solver-access time that overrides the project default.
View and manage problems submitted to solvers in the projects
You can view and filter a list of problem submissions, access the details of any problem, and cancel pending submissions.
Generate and export usage reports
You can generate usage reports and export them to XLSX and CSV files.
Terminology#
Application
A program that submits problems to solvers.
Organization
Any organization such as a company or institution that has one or more associated projects.
Organization administrator
A project member who has the Organization Admin role.
Project
A logical or organizational grouping of project members that is used to manage members’ solver access.
Project administrator
A project member who has the Project Admin role.
Project member
A user who has joined a project in the Leap service, also known as a member.
Role
A role gives a member the privileges to perform specific actions in a project or organization. A role can be either Project Admin, User, or Organization Admin. The Project Admin role is intended for people who administer a project. The Organization Admin role is intended for people who administer an organization and its associated projects. Only members with the Project Admin or Organization Admin role can access Leap Admin. The User role is intended for people whose main activity is submitting problems. For more information, see Member Roles and Privileges.
Seat
A seat represents access to a project’s solvers for a single member or application. A customer contract specifies the number of seats that are available for each seat type.
Seat type
A seat type specifies the capabilities and limitations of a seat; for example, a User seat is intended for members whose main activity is submitting problems.
For more information, see Seat Types.
Solver access limit
The maximum amount of solver-access time that a member or application can consume for a monthly renewal period. This maximum cannot be greater than the project’s total amount of solver-access time, which is unlimited for most seat-based projects.
Conventions#
For sequential steps in the user interface, variables are indicated in italics; for example, Leap Admin > project_name.
Quick Start#
The goal of this subsection is to invite people to a seat-based project.
To log in to Leap Admin, you must have received an email to join a project as a project administrator. A project administrator for a project is a member who has the Project Admin role in that project. If you did not receive an email invitation as expected, contact your organization administrator or D‑Wave Customer Support.
Note
If your invitation has expired or if you did not receive one, contact D‑Wave Customer Support.
To invite people to a project, perform the following tasks:
Logging in to Leap Admin#
Log in to the Leap service at https://cloud.dwavesys.com/leap/login/.
In the upper right corner of the dashboard, select your_profile_avatar > Leap Admin as shown in Figure 264.
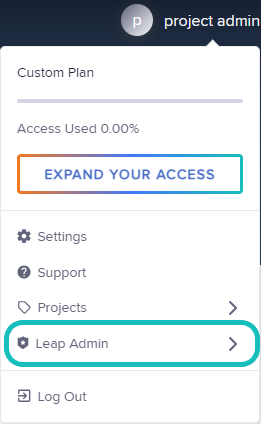
Fig. 264 Leap Admin: Login Menu#
Note
If you are a project administrator for multiple projects, select your_profile_avatar > Leap Admin > project_name.
Inviting People to a Project#
Click Invite > role.
A role gives a member the privileges to perform specific actions in a project. For more information, see Member Roles and Privileges.
Tip
As a best practice, invite additional project and organization administrators as backups.
Select the seat type for the people to be invited in the Seat Type field.
For more information, see the following sections:
Specify the email addresses of the people to add to the project.
If an error occurs when specifying an email address, ensure that the email address is allowed as specified (individually or by pattern) in the Allowed Email Settings section.
If the email address is not permitted in the Allowed Email Settings section on the Overview page, contact your organization administrator or D‑Wave Customer Support.
Managing Organizations#
Note
To create an organization, contact D‑Wave Customer Support.
A customer contract defines an organization, which represents a company or institution in the Leap service. An organization contains one or more associated projects.
Organization Administrators#
Organization administrators can invite people to the Leap service in any role as well as administer many aspects of the projects contained in their organization, including specifying a project’s allowed email addresses and performing all tasks that a project administrator can.
Viewing Allowed Emails#
The Allowed Email Settings section displays the email addresses, domains, and subdomains that are allowed for the members of all projects in an organization. Organization administrators can further restrict each project’s allowed email addresses.
Note
If you need to change an organization’s allowed email addresses for project members, contact D‑Wave Customer Support.
Viewing Summary Information for Projects#
The organization’s Projects tab displays summary information for all projects in an organization.
Project Name |
Name of the project. Click the name to go to its project page. |
Active Members (Count) |
Number of active members in the project. |
Monthly Usage |
Amount of solver-access time that has been consumed in the project for the month. |
Solver Access Time |
Amount of solver-access time aggregated over all active records for the project. |
Contract Expiration |
Date that the contract with which the project is associated expires. |
Creation Date |
Date that the project was created. |
Project Status |
Status of the project. For a description of project statuses, see the Viewing Project Status section. |
Filtering and Sorting the Columns#
Clicking the icons in the table headings or selecting the fields above the table performs the following actions:
|
Filters the rows by matching a part of the project name. |
|
Filters the rows by a combination of project attributes, such as project name, project status, and a range of dates for when the project’s contract is to expire. |
|
Sorts in ascending or descending order. |
|
Sets the filters for a column. |
|
Specifies the unit of time for the column. In addition, for the Monthly Usage column, specifies the percent usage. |


Viewing Organization Status#
An organization’s status is the state of the organization in the organization life cycle and is displayed next to the organization name on the organization’s page. The life-cycle states are the following:
New |
The organization has been created, but none of its projects have started as determined by the earliest start date of any project’s solver-access time allocation. |
Active |
At least one of the organization’s projects has started as determined by the earliest start date of any project’s solver-access time allocation. |
Expired |
The end date of all solver-access time allocations in all the organization’s projects has been reached. |
Managing Projects#
Note
To create a project, contact D‑Wave Customer Support.
A customer contract defines each project, including the project type (seat- or time-based), the solvers that are available, and the allowed email addresses for project members.
In addition to viewing the email domains and subdomains (or individual email addresses) of the people who can be invited and project-level information such as the available solvers and the project’s seats, you can also change a few project settings, such as its customer reference ID and members’ limits on solver-access time and seat types.
Tip
To go to another project, select your_profile_avatar > Projects > project_name.
To go to the organization, click the Home icon.
Seat- versus Time-based Projects#
Both seat- and time-based projects are supported as follows:
Seat-based projects enable you to easily assign a project member, such as a developer whose main activity is submitting problems, to a seat of a predefined type that best meets the member’s intended use.
Time-based projects do not have seats; instead you allocate an amount of solver-access time to each project member.
Searching for Projects and Members#
To search for a project that you administrator or for a member in a project that you administer, do the following:
Click in the global search field
 (at the top of the page)
and enter the text to search for.
(at the top of the page)
and enter the text to search for.The text matches any part of a project or member name (including an email address). The matching projects and member names are displayed in a dropdown list.
Tip
The global search shortcut key is / (forward slash).
Limitations
The search is case-insensitive.
Only the Latin-1 character set is supported.
The minimum number of characters required to display matches is 3.
The maximum number of characters is 254.
If one of the specific members or projects in the dropdown list is what you are searching for, then select it; otherwise, narrow your search by selecting one of the following options from the dropdown list:
Show all results for search_text
Displays a list of all matching project and member names.
Users ( number_of_results ) — Show All
Displays a list of all matching member names.
Projects ( number_of_results ) — Show All
Displays a list of all matching project names.
Tip
Use the Up and Down arrow keys to select an item in the results list and press Enter to go to the selection.
To go back to the complete search results, click Search Results.
To try a new search, replace the text in the global search field
.
Viewing Basic Information#
Basic information, such as a project’s name, status, and associated organization, is displayed on the project page’s title banner; additional basic information is displayed in the following sections on the project’s Overview tab.
Project Monthly Solver Time Usage |
Percent of solver-access time used in the project for the current renewal period. |
Project Name |
Name of the project. |
System Project ID |
Unique identifier for a project. It is used for internal purposes, such as a prefix for the project’s API token. |
Project Creation Date |
Date that the project was created. |
Customer Reference ID |
ID that you provide and which can be used for your specific internal processes. |
Viewing Project Seats#
Each project member, whether a person or an application, occupies a single seat of a given type. The number of seats and seat types are determined by the customer contract. Each row in the Project Seats section represents a particular seat type, including such information as the number of seats currently occupied and the limit on solver-access time, as follows:
Seat Type |
The name of the seat type. |
Seats Occupied |
The number of seats that are currently allocated to members or
applications out of the maximum number of seats that can be
occupied; for example, A seat is considered to be occupied once an invitation has been sent. The number of members in a project at any one time cannot exceed the total number of seats available for all seat types. |
Solver Access Limit |
The maximum amount of solver-access time that a member or application can consume for a monthly renewal period. This maximum cannot be greater than the project’s total amount of solver-access time, which is unlimited for most seat-based projects. |
Seat Description |
The description for the seat type. For more information, see Seat Types. |
To change a member’s seat type, see the Changing a Project Member’s Seat Type section.
Seat Types#
A seat type specifies the capabilities and limitations of a seat; for example, a User seat is intended for members whose main activity is submitting problems.
You can switch a member or application between seat types, but a member or application can only occupy one seat type at any one time.
Examples of seat types are as follows:
User |
Intended for members whose main activity is submitting problems; for example, a developer. This seat type provides an unlimited amount of solver-access time. |
Observer |
Intended for members whose main activity is administration or troubleshooting; they do not submit problems frequently. This seat type provides a limited amount of solver-access time. |
Service Account |
Intended for applications that submit problems; for example, a production application that submits problems on a schedule. This seat type provides an unlimited amount of solver-access time. |
Inactive |
Intended for members who should remain in the project but are temporarily inactive. They cannot submit problems to solvers. |
Viewing Solver-Access Time#
The Solver Access Time Schedule section displays the solver-access time records as determined by the customer contract.
Tip
A project administrator receives a notification when the project’s solver-access time reaches 80%.
Solver-Access Time Records#
A solver-access time record is an amount of solver-access time for a specific period of days. A gap or overlap of solver-access time can occur between records. For example, if a new contract states that solver-access time be increased by 1 hour for September, then instead of increasing the solver-access time for an existing record, a separate record is created for 1 hour of solver-access time from September 1 to 30.
Thus, record periods (in units of whole days) can be contiguous, overlap, or have gaps between them. Figure 265 illustrates the following:
A gap occurs between record 1 and the set of records 2 because the start date in record 1 is not contiguous with the closest end date in the set of records 2.
The records in the set of records 2 are contiguous.
In the set of records 2, the middle record overlaps with the previous record.

Fig. 265 Example of Solver-Access Time Records#
Renewal Date#
Solver-access time renews every month simultaneously for all active records. The renewal date is the day of the month that is specified in the anniversary date for all active records; however, if the anniversary date’s day of the month is greater than the last day of a renewal month, then the renewal date is the last day of the month. For example, if the anniversary date is January 31, then the next renewal date is February 28 (or February 29 in a leap year).
Note
If there is a gap between records and the first one expires, then the renewal date is set to the next record’s renewal date, which might differ from the first record’s renewal date.
Anniversary Date#
When a record is created, the anniversary date is automatically calculated as follows:
The anniversary date is the start date of the new record, if either of the following is true:
The new record is the only active or scheduled record in the project.
There is a gap between the new record and an active or scheduled record.
The anniversary date is the same as the existing active or scheduled records if the new record is contiguous with those existing records.
Solver Access Time |
A record’s amount of solver-access time available for each renewal period. Consumption of solver-access time is aggregated across all regions. Note: The maximum number of problems per member that can be in a solver queue is 1,000; if this maximum is exceeded, then problems are rejected. |
Start Date (UTC) |
The date (inclusive) that access is provided to solvers. This date is determined by the customer contract. |
End Date (UTC) |
The date (inclusive) that access to solvers ends. This date is determined by the customer contract. |
Anniversary Date (UTC) |
The anniversary date is used to calculate the renewal date. |
Status |
Active: The current date is between the record’s start and end dates. Only active records contribute solver-access time. Disabled: The record was disabled by D‑Wave. Scheduled: The record has been scheduled for activation beyond the current date. When the current date reaches the record’s start date, then the record is activated. Expired: The current date has passed the record’s end date. |
Project Member Default Solver Access Limit (time-based projects only) |
Specify the default limit on solver-access time for new members who accept the invitation for the project after this field has been set. Existing members are not impacted; they retain the current limit on their solver-access time. The Set Default to Unlimited Access option allows any project member to use the full monthly solver-access time allocated to the project as determined by the sum of the project’s active solver-access time records. For more information, see the Changing the Solver-Access Time Limit for Time-based Projects section. |
Project Allocation Summary (time-based projects only) |
The information in this section aggregates key information for the active records in the project. |
Changing the Allowed Email Addresses for Members#
If you are an organization administrator, you can change the email addresses that are allowed for members.
You specify email addresses either individually or by pattern via the wildcard
(* (asterisk)) symbol in the Permitted Emails list of the
Allowed Email Settings section. Although patterns are flexible, they
typically map to domains or subdomains. For example, to allow all email
addresses at mycompany.com, specify *@mycompany.com; to allow all email
addresses at mycompany.com and any of its subdomains, in addition to
*@mycompany.com, specify *.mycompany.com.
The project’s parent organization also limits the allowed email addresses. You
can invite only people whose email addresses are allowed by both. For example,
if *@quantumcompany.com only is specified for the organization, but you
specify *@classiccompany.com only for the project, then you cannot invite
anyone.
You add, remove, and edit an email address or pattern in the Overview > Allowed Email Settings section as follows:
Add New Email > Add |
Enter the email address or pattern and click Add. |
Permitted Emails > Remove |
To remove an email address or pattern, select it and click Remove. Note: This action does not affect existing members of the project. |
Permitted Emails > Edit |
To edit an email address or pattern, select it and click Edit. |
Tip
To select multiple email addresses or patterns, use Shift + click
or Ctrl + click.
Viewing Available Solvers#
You view a list of solvers that are available in the project in the Overview > Project Solvers section. The status of solvers is displayed in the Status column.
Solvers are specific to a region (for example, Europe or North America). To display the solvers for a region, click the region name. The solvers that are available in a project are determined by the customer contract.
To view a solver’s properties and parameters, click its name in the Solver Name column. For more information on solver properties and parameters, see the Solver Properties & Parameters and Quantum Research sections.
Viewing Project Status#
A project’s status is the state of the project in the project life cycle as follows:
Tip
Project status is displayed in the project page’s title banner.
New |
The project has been created, but its start date has not been reached. You can specify the people to be invited, but the invitations themselves are not sent until the start date has been reached. |
Active |
The project has started as determined by its start date. Note: Invitations that have been scheduled are sent on the start date. |
Suspended |
The project cannot be used. Note: This is an exception state. If you believe your project should not have been suspended, contact D‑Wave Customer Support. |
Expired |
The end date for the project’s solver-access time has been reached. Project members can still log in to the project, but cannot run problems on the solvers. |
Changing the Solver-Access Time Limit for Time-based Projects#
Note
This feature applies to time-based projects only.
By default, any one project member can use up all of a project’s monthly solver-access time. If you want to change this default or set a different limit for an individual member, do the following:
Go to the project page’s Overview tab > Solver Access Time Schedule section > Project Member Default Solver Access Limit field.
Specify the default limit on solver-access time for new members who accept the invitation for the project after this field has been set. Existing members are not impacted; they retain the current limit on their solver-access time.
The Set Default to Unlimited Access option allows any project member to use the full monthly solver-access time allocated to the project as determined by the sum of the project’s active solver-access time records. If you want to keep project members from using up all of the project’s monthly solver-access time[1], deselect this option and enter a specific amount in the Project Member Default Solver Access Limit field. Consider an example where monthly solver-access time, which is the sum of the project’s active solver-access time records, is 30 minutes. If you want to keep any one of your project members from using up all of this time and limit them to 5 minutes each per month, then you specify 5 minutes in the Project Member Default Solver Access Limit field.
To override this default and specify a different amount of solver-access time for an individual member, see the Modifying the Limit on a Member’s Solver-Access Time section.
Managing Project Members#
You manage project members by first inviting people to join a project and managing the invitation process, including sending them reminders to accept the invitation and revoking invitations. You can also change members’ roles, seat types, and solver-access time limits as well as remove members from projects.
Member Roles and Privileges#
A member has one of the following roles and associated privileges.
User |
Project member who has the following privileges in the project:
Members that have the User role cannot access Leap Admin. |
Project Admin |
Project member who has the following privileges in the project:
|
Organization Admin |
Project member who has the following privileges in the organization and its projects:
|
Inviting People to Join a Project#
You invite people to join a project by sending them email invitations via Leap Admin. To join the project, the person must accept the invitation by clicking the link in the email. A person who is new to the Leap service must also create an account.
Invitations expire after 30 days; you can send reminders to people who have active invitations. If an invitation expires or is revoked, you can send a new invitation.
Access to the Leap service is supported only from certain regions. For more information, see the From What Countries Can I Access D-Wave’s Leap Quantum Cloud Service article.
When creating an account or joining a project, the person might be required to accept the D‑Wave terms and conditions. The customer contract determines whether or not this is required for people joining the project.
Note
To change whether accepting terms and conditions is required or not, contact D‑Wave Customer Support.
Procedure#
To invite people to join a project or organization, click Invite > role.
Role is one of the project member roles to assign to a person: User, Project Admin, or Organization Admin. Only an organization administrator can assign the Organization Admin role.
For more information, see Member Roles and Privileges.
In the invitation dialog box, specify the following fields:
Table 81 Invitation Dialog Box# Organization
(Read-only) Organization to which you are inviting people.
Project
Project to which you are inviting people.
Seat Type
An available seat type for the invitees. For more information, see the Seat Types section.
Email
Email addresses or member names (if they already exist in the Leap service) of the people you want to invite to the project.
Tip:
You can copy and paste multiple email addresses from either a single column in an Excel spreadsheet or a semicolon-, space-, new line-, or comma-delimited list (for example, a CSV file).
To edit an invitee, double-click the field for the invitee’s name or email address.
To display an email address, place the pointer over the invitee field.
To delete an invitee at the end of the list, place the cursor at the end of the list and press Backspace. To delete the next invitee, press Backspace again.
Note: The email addresses to be added must be specified in the Overview tab > Allowed Email Settings section. For more information, see Changing the Allowed Email Addresses for Members.
Set solver access limit (time-based projects only)
Maximum amount of solver-access time available per month for the specified invitees. You set this maximum with one of the following options:
Deselected
(Default) This field is set to the amount of solver-access time in the Project Member Default Solver Access Limit field.
Selected
Choose one of the following options:
Use Project Default — Sets the maximum amount of solver-access time to the lower of either the value in the Project Member Default Solver Access Limit field or the sum of the project’s active solver-access time records.
Unlimited Access to Project Solver Time — Sets the maximum amount of solver-access time to the full monthly solver-access time allocated to the project as determined by the sum of the project’s active solver-access time records.
Custom Amount — Sets the maximum amount of solver-access time to the lower of either this custom value or the sum of the project’s active solver-access time records.
Once people occupy seats in a project, they have the privileges associated with their role as described in Member Roles and Privileges; for example, access to the project’s solvers.
Viewing the Status of a Member#
To view the status of a member, go to the Project Members tab and look at the Membership Status column.
Invitation Pending |
The invitation has been created but not sent because the project has not started. |
Invitation Sent |
The person has been invited to the project, but has not accepted. You can send a reminder. |
Invitation Revoked |
The invitation has been revoked. |
Invitation Expired |
The invitation to the person has expired. An invitation expires after 7 days. You can send a reminder. |
Active |
The person has accepted the invitation. |
Solver Access Expired |
The member’s solver-access time has expired for the project. |
Inactive |
The person is no longer a member of the project; however, the person might still be a member of another project. Nevertheless, the person’s statistics such as the problems they submitted and problem access time used are still displayed in the project. Note: This status is displayed for historical purposes. |
Sending Reminders#
You can send invitation reminders to one or more invitees.
To send an invitation reminder to an invitee, click
 >
Send invitation reminder in the table on the Project Members tab.
>
Send invitation reminder in the table on the Project Members tab.To send invitation reminders to multiple invitees simultaneously, perform the following:
On the Project Members tab, select the invitees to which to send invitation reminders.
Tip
You can select all invitees on the page by selecting the checkbox in the header row (next to User).
Select the Manage Selected > Send invitation reminder menu.
Tip
The context menu is displayed in an invitee’s row on the far
right when you hover the pointer over the row.
Resending Invitations#
You can resend invitations that have expired.
To resend an invitation, click
>
Resend invitation in the table on the Project Members tab.To resend the invitation to multiple invitees simultaneously, perform the following:
On the Project Members tab, select the invitees for which to resend invitations.
Tip
You can select all invitees on the page by selecting the checkbox in the header row (next to User).
Select the Manage Selected > Resend invitation menu.
Revoking Invitations#
You can revoke invitations for one or more invitees.
To revoke the invitation for an invitee, click
>
Revoke invitation in the table on the Project Members tab.To revoke the invitations for multiple invitees simultaneously, perform the following:
On the Project Members tab, select the invitees for which to revoke invitations.
Tip
You can select all invitees on the page by selecting the checkbox in the header row (next to User).
Select the Manage Selected > Revoke invitation menu.
Searching for Project Members#
To find a member in any project, use the global search field
at the top of the page. For more information, see
Searching for Projects and Members.
Viewing Member Information#
A list of members is displayed on the Project Members tab as follows:
User |
Name and email address of the member. Click the name to display more information about the member. Note
|
Seat Type |
A seat type gives a member a certain amount of solver-access time. For more information, see Seat Types. |
Role |
A role gives a member certain privileges. For more information, see Member Roles and Privileges. |
Project Usage for Month |
Displays the amount of solver-access time that a member has consumed for all solvers during the monthly renewal period. Solvers have different usage rates. For more information, see the Operation and Timing section. |
Solver Access Limit |
Displays the amount of solver-access time that is allocated to a member. |
Membership Status |
The status of the member in the project. For more information, see Viewing the Status of a Member. Tip: In the Membership Status column filter, the number of members in a particular status for the project is displayed in parentheses next to the status name. |
To display information on a specific member, click the project’s Project Members tab > member_name. The following information is displayed:
User Profile |
Basic information about the member. |
Problem Status |
The status of the problems that the member submitted to the solvers in a project. For more information, see Viewing the Status of Problem Submissions. |
Reporting |
Reports on the member’s solver usage. For more information, see Generating Solver Usage Reports. |
Filtering and Sorting the Columns#
Clicking the icons in the table headings or selecting the fields above the table performs the following actions:
|
Filters the rows by matching a part of the member name. |
|
Filters the rows by a combination of membership status, seat type, role, and part of a member name. |
|
Sorts in ascending or descending order. |
|
Sets the filters for a column. |
|
Specifies the unit of time for the column. |
Changing a Project Member’s Seat Type#
On the project’s Project Members tab, click for a member
in the table and select Change seat type.
For example, if a project member who occupies a User seat is on vacation, you could temporarily free up their seat by changing their seat type to Inactive and then inviting another person to occupy the seat and submit problems until the vacationing member returns.
Note
Switching a member or application to a seat type with less solver-access time than already consumed in the current period disables problem submission for that member or application until the next period.
Modifying the Limit on a Member’s Solver-Access Time#
On the Project Members tab, click
for a member in the
table and select Modify Solver Access Limit.
In the Modify Solver Access Time dialog box, select one of the following to set the desired limit on solver-access time:
Use Seat-Type Default — Sets the maximum amount of solver-access time to the seat type’s solver-access limit as specified in the Seat-Type Default Limit field.
Custom Amount — Sets the maximum amount of solver-access time to this custom value. This value must be equal to or less than the seat type’s solver-access limit as specified in the Seat-Type Default Limit field.
For time-based projects, sets the maximum amount of solver-access time to the lower of either this custom value or the sum of the project’s active solver-access time records.
Use Project Default (time-based projects only) — Sets the maximum amount of solver-access time to the lower of either the value in the Project Member Default Solver Access Limit field or the sum of the project’s active solver-access time records.
Unlimited Access to Project Solver Time (time-based projects only) — Sets the maximum amount of solver-access time to the full monthly solver-access time allocated to the project as determined by the sum of the project’s active solver-access time records.
Tip
To change the limit on solver-access time for multiple members simultaneously, perform the following:
On the Project Members tab, select the members for whom you want to change the limit on solver-access time. The selected members must occupy the same seat type.
Select the Manage Selected > Modify Solver Access Limit menu.
Set the desired limit on solver-access time in the Modify Solver Access Limit dialog box, which is the same one that is displayed for a single member.
Changing a Member’s Role#
On the Project Members tab, click for a member in the table
and select one of the following:
Remove Project Admin Role
Changes the member’s role to User.
Note
You cannot remove your own Project Admin role. Instead, ask another organization or project administrator to do so.
Remove Organization Admin Role
Changes the member’s role to User or Project Admin, whichever was the member’s previous role. Only an organization administrator can perform this action.
Note
You cannot remove your own Organization Admin role. Instead, ask another organization administrator to do so.
Assign project admin
Changes the member’s role to Project Admin.
Assign organization admin
Changes the member’s role to Organization Admin. Only an organization administrator can perform this action.
Removing Members From a Project#
You can remove one or more members simultaneously.
Note
You can only remove members whose membership status is Active.
On the Project Members tab, click
for a member and
select Remove from project.To remove multiple members simultaneously, perform the following:
On the Project Members tab, select the members to remove.
Tip
You can select all members on the page by selecting the checkbox in the header row (next to User).
Select the Manage Selected > Remove from project menu.
If you do not want to send notifications to members, select the option to not send email notifications to members in the dialog box that is displayed.
When members are removed, their statuses change to Inactive for the project and they can no longer use the solvers in the project. However, their usage statistics are preserved for historical purposes.
If you remove a member with the Org Admin role from that member’s last project, then the Org Admin role is also removed from the member.
If you want a person to rejoin a project or return as an organization administrator, send an invitation as described in Inviting People to Join a Project.
If you are the only organization administrator in an organization and you remove yourself from your last project, your Org Admin role is removed and you will not be able to access the organization in Leap Admin. To reinstate access, contact D‑Wave Customer Support.
Managing Problem Submissions#
You manage problem submissions by viewing the status and details of problem submissions and cancelling problem submissions.
Viewing the Status of Problem Submissions#
To view the status of problems submitted to a project’s solvers, go to the Problem Status tab.
Tip
To display the most up-to-date status, click Refresh Table.
To copy a problem ID to the clipboard, hover over the problem ID and click the copy icon that is displayed.
The following information is displayed:
Problem ID/Problem Label |
The problem’s ID or label. The ID is system-generated. |
User |
The member name and email address of the person who submitted the problem. |
Submitted On (UTC) |
When the problem was submitted. Includes the date and time in UTC. |
Ended (UTC) |
When processing of the problem ended. Includes the date and time in UTC. |
Solver |
The name of the solver to which the problem was submitted. |
Problem Status |
The status of the submitted problem. For more information, see Problem Submission Statuses. |
Region: selected_region |
Sets the solver region (for example, Europe or North America). Only the problems submitted to that region’s solvers are displayed. |
Problem Submission Statuses#
In the Problem Status column, the status of each problem submission can be one of the following:
Pending |
The problem was submitted, but the solver has not started working on a solution. |
In-Progress |
The problem was submitted and the solver is working on a solution. |
Completed |
The solver has successfully completed its work on the problem. |
Cancelling |
A request to cancel work on a problem is being processed. |
Cancelled |
Work on the problem has been cancelled. Cancelled problems do not use any solver-access time. |
Failed |
Work on the problem did not successfully complete. Failed problems do not use any solver-access time. |
Filtering and Sorting the Columns#
Clicking the icons in the table headings or selecting the fields above the table performs the following actions:
|
Filters the rows by matching a part of the problem ID or label. |
|
Filters the rows by a combination of a part of a member name or email address, problem status, solvers (by region), and submission beginning and ending dates and times. Tip: You can exclude problems via the Add filter option’s Is not condition. Note: To change the region, select the desired region in the Region: current_region field. |
|
Sorts in ascending or descending order. |
|
Filters on the status in the Problem Status column. |
|
Displays either problem IDs or problem labels in the column. |
Viewing Problem Submission Details#
To view a problem’s details, click a problem ID or problem label on the Problem Status tab. The following information is displayed:
Problem Parameters |
Displays the problem’s parameters, ID, solver, problem type, status, and embedded problem data. For more information, see the Solver Properties & Parameters and Quantum Research sections. |
Solution |
Displays the resulting sample set, which you can export along with a sample set visualization. |
Timing |
Displays timing parameters for the problem. For more information, see the Operation and Timing section. |
Cancelling Problem Submissions#
To cancel a pending or in-progress problem, click the X in the problem’s Problem Status column.
To cancel multiple pending or in-progress problems, select the checkbox for each problem and click Cancel Problems > Cancel Selected. Cancelled problems do not use any solver-access time.
Tip
Before cancelling problem submissions, display the most up-to-date status by clicking Refresh Table.
If you run scripts to continuously submit problems, refresh the table after cancelling problem submissions to confirm that the cancellation attempts succeeded.
Generating Solver Usage Reports#
Reports on solver usage contain statistics that characterize how your projects and individuals use solver time in a project over a period of time. These statistics are organized into the following categories:
Information about the members who submitted problems
Number of submitted problems
Solver times; they are further described as follows:
Solver category: QPU, hybrid, or custom
Solver names
Totals and subtotals of solver-access times
The unit of time scale (for example, daily, monthly, and so forth) as displayed in the Aggregate Time Scale field.
The statistics are exported as either an XLSX and CSV file. See the spreadsheet column headings for the exact statistics. On the Reporting tab, you specify filters for the statistics.
To configure and generate solver usage reports, go to the Reporting tab and specify the following filter fields:
Projects |
(Read-only) The project to be included in the report. |
Users |
The members whose solver usage is to be included in the report. |
Date Range |
|
Solvers |
The solvers for which their usage is to be included in the report. Solvers are specific to a region (for example, Europe or North America). To select the solvers for a region, click the region name and select the desired solvers. Tip To select all the solvers in all regions, select All Regions, Solvers. |
Format |
|
Tip
To reset the filter fields to their default values, click Reset Template.
To get all values for a field, leave it blank. For example, to generate statistics for all members, leave the Users field blank.